<img height="1" width="1" style="display:none" src="https://www.facebook.com/tr?id=424649934352787&amp;ev=PageView&amp;noscript=1">

NIFS Healthy Living Blog

Improve Your Weakness: Train Your Fitness Flaws

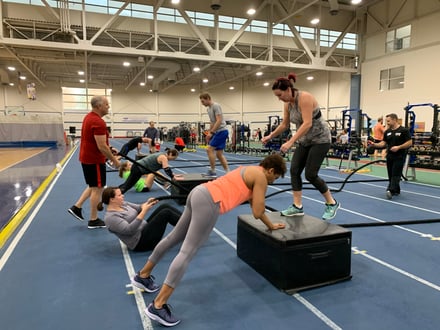
Screen Shot 2021-09-27 at 1.55.13 PMWouldn’t it be satisfying to not be weak at something? We’re all born with differing personality traits and those exist as either our strength or our weakness. We are generally aware of these traits, which fall on either side of the line. It is normal to single out our strengths to share and use publicly because we are proud of them. However, it makes sense that we downplay our weaknesses and hide them as much as possible. It is also our human nature to speculate how we stack up in comparison to other individuals. Whether applying for a new job, competing in a sporting event, or even scrolling through social media, we are looking to see how others are doing and comparing ourselves to them.

Here, I will explore the benefits of training your flaw—in other words, making your weaknesses your strengths.

Individual Goals and Beliefs

Everyone has their own goals and beliefs, but if it were up to me, I would rather be decent at several things than great at only one. When it comes to health and fitness, I urge you to be a well-rounded individual. Whereas the nutrition aspect is difficult for some, others might have the self-control and discipline to succeed at it. Some people might enjoy a good sweat session when others despise even setting foot in a fitness center for various reasons.

We gravitate toward what comes easy or what we enjoy more, leaving behind what we dislike, and that which needs the most work. My goal is to be the best version of myself no matter how long it takes. To accomplish this, I must first identify my weaknesses and dislikes. Once I complete this, the next step is to set new goals and come up with a plan of attack. This typically means starting with the weakest links.

Pinpoint Your Weaknesses

You may or may not have specific goals, so I will explain by sharing examples. The first example is CrossFit. I personally do not participate in CrossFit; however, the concept is quite clever. Their quest to attain the title of “Fittest on Earth” stems from being the ultimate athlete. CrossFit has identified 10 measurable fitness categories, such as stamina, strength, power, speed, flexibility, balance, coordination, agility, accuracy, and cardiovascular fitness. If every exercise that ever existed were written on slips of paper and you had to draw one out of the hat and complete it, could you do it and do it efficiently?

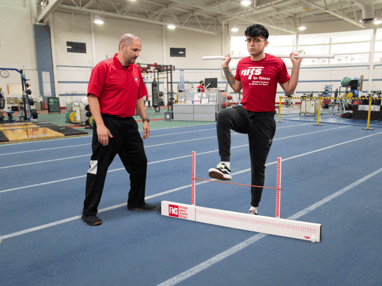
Another example would be the use of the Functional Movement Screen (FMS). It scores me based on what I am proficient at and where I fall short within seven distinct movement patterns seen not only in exercise, but also in day-to-day life. The strategic plan of attack is to start with the lowest scores to make them better so that all the other movement patterns can improve as well. Basically, the test pinpoints your weakest link (movement pattern), and the goal is to improve the movement and restore function by reducing the risk of injury.

NIFS staff members are certified to not only complete the FMS testing, but also to design corrective exercises and workout plans tailored to individual needs. Contact one of our Health Fitness Instructors, who can assist you in testing what may be a weak point for you (such as the bench press, squat, deadlift, pull-ups, stamina, mobility, and so on).

Strive for Progress

Lastly, it’s no secret that we tend to shy away from what we aren’t good at, even when it comes to our health and fitness. With some courage and the help of others, we can begin to expose our downfalls and identify weaknesses we may be blind to and start finding ways to make improvements. We should always be striving for progress rather than perfection. Find a program that improves on your weaknesses. Growth and change are not easy, but the benefits you gain are well worth it! 

Like what you've just read? Click here to subscribe to our blog!

This blog was written by Cara Hartman, NIFS Health Fitness Instructor. To find out more about the NIFS bloggers, click here.

Topics: NIFS fitness center nifs staff personal training CrossFit goals fitness assessment

Back to Exercise Basics: The Split Squat

As we continue down the road of improving our basic movement patterns (which is always under construction, by the way), we take a look at the squat pattern and its variations a bit further. Many fitness pros, including myself, argue that we spend more time on one leg than we do on two. Think about it: walking, running, traveling up stairs—for varying amounts of time, you can find yourself on one leg a lot.

What Makes a Split Squat a Split Squat?

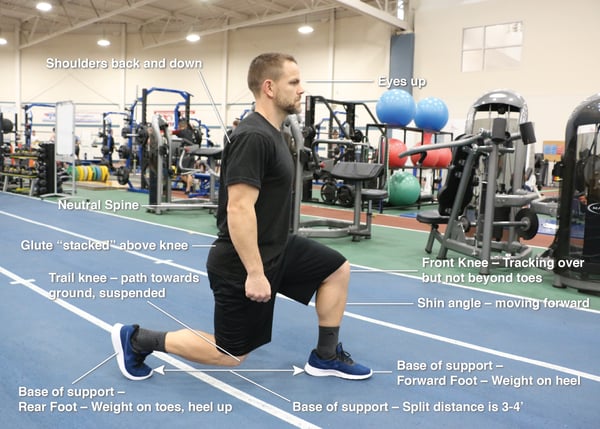
So if you are on one leg a bunch, it only makes sense that you build that position to be strong and stable, and in many different planes of motion. Let’s take a look at what makes a split squat a split squat, which is very different from the lunge but often is called by the same name (kind of a pet peeve of mine).

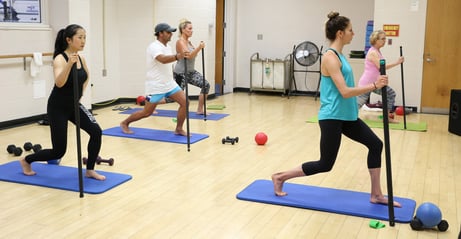
Tony_split-squat

  1. Base of support—Forward Foot – Weight on heel
  2. Base of support—Rear Foot – Weight on toes, heel up
  3. Base of support—Split distance is 3-4’ 
  4. Shin angle—moving forward
  5. Front Knee – Tracking over but not beyond toes
  6. Trail knee – path towards ground, suspended
  7. Glute “stacked” above knee
  8. Neutral Spine
  9. Shoulders back and down
  10. Eyes up

Many of the aspects of the regular squat are found in the split. You are simply in a single-leg-supported position.

Options to Get More Out of the Split Squat

Now that you have the foundation, here are a few options you can use to get more out of this movement pattern.

  1. TRX Split Squat
  2. 2KB Split Squat—Farmer position
  3. 1KB RFEE Split Squat—Down position
  4. 2KB Split Squat-Racked position


Exercise Variations in the Frontal and Transverse Planes

Human beings need to travel in 3D. It’s important to all of us, from the athlete to the accountant. Often we train in one plane of motion, typically the sagittal plane (in the regular squat, for example, or the overhead press). But in the real world we move in more ways than straight ahead. Here are some variations that will get you in the frontal (side-to-side) and the transverse (rotational) planes.

  1. 3D Body Weight
  2. Offset KB Spit Squat
  3. SaB Lateral Split Squat
  4. SaB + KB Rot. Split Squat


The split squat is a super-important movement pattern that I feel we need to train more. As single-leg beings, mastering this pattern in multiple planes will transfer big time to the real world and allow us to move better, more often, with fewer injuries.

Like what you've just read? Click here to subscribe to our blog!

This blog was written by Tony Maloney, ACSM Certified Exercise Physiologist and Fitness Center Manager. To find out more about the NIFS bloggers, click here.

Topics: fitness center injury prevention functional movement movement squat stability leg day exercise basics

Foam Rolling: The Next Big Thing in Pain Relief and Injury Prevention

GettyImages-686409390For the majority of my athletic and fitness career, getting sore from activities, workouts, practices, or games has not only been a sign that work has been done, but also a rite of passage. The saying, “no pain, no gain” came about as a result, and the world would judge successful workouts on soreness.

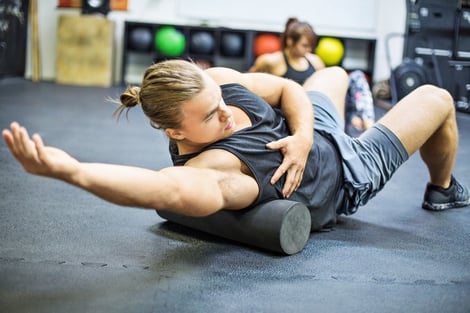
Those days have come and gone, and fitness professionals have come to the understanding that the old saying definitely needs updating. While getting a great workout and being sore is fine, being able to prevent injury, decrease soreness, improve mobility, and increase blood circulation are things we would like to incorporate into our wellness on a daily basis. One thing that I have found in my fitness journey is that you can get a great workout today, and with proper foam rolling (also known as self-myofascial release), you can get back after it tomorrow.

A Brief History of Foam Rolling

Foam rolling might seem like it’s a fairly new concept, but the idea has been around quite a while within manual physical therapy circles and with nontraditional medicine practitioners. In the late 19th century, physicians were using manual therapy to improve blood circulation and lymph flow. Although there are almost no studies that show that foam rolling had any benefits, the people that these techniques were being implemented on seemed to see the benefit.

Fast-forwarding to modern times, we have seen a boom in various industries associated with massage and related therapies. Individuals are seeing great results from meeting with these professionals and become interested not only in the tools they are using, but also in figuring out ways to implement similar techniques and experiences as a way to a quick-fix home remedy. Thus was born the foam roller, which now comes in many sizes, lengths, and shapes, and can be supplemented with everything from heat and ice to vibration discs.

How to Start Foam Rolling

Here are some quick tips and ideas to get you on your way.

  • Choosing a density: Pick a foam roller density that matches your comfort level. The softer foam rollers are geared more for beginners who might be sensitive and unable to cope with the discomfort a denser foam roller brings. As you become more accustomed to foam rolling, you may increase the foam roller density to your desired comfort level. As with getting a deep-tissue massage, it might feel uncomfortable at the time, but you may feel great right away, and tomorrow you will feel like a million dollars!
  • Rolling before and after bed: NIFS Personal Trainer Kris Simpson, a huge proponent and practitioner of foam rolling, says, “Foam rolling before bed is a great way to relieve muscle tension and stress from a long day. You will sleep better while being better rested, in turn giving you a head start on the following day. Again foam rolling in the morning would help get the blood flowing after a long, unrestful sleep.”
  • Finding a pattern: Another NIFS Trainer, Cara Hartman, uses foam rollers with her athletes. She has all of her clients and athletes follow a pattern that makes sense. “We like to start lower posterior (calves) and work our way up (hamstrings, glutes, back, etc). Smaller muscles can be rolled with a little creativity. If you find yourself unable to perform a movement, try putting the foam roller against the wall and rolling vertically as opposed to horizontally.”
  • Watch our video on how to properly foam roll.

As you work to get better at foam rolling, understand that it is very similar to everything you do in life. It will be most difficult the very first time you do it, but it will get a little easier each time you try it. I have a personal philosophy regarding foam rolling:

“If you want to maintain current mobility and flexibility, foam roll one time per day. If you want to increase mobility and flexibility, foam roll more than one time per day (the only limit is how much time you have to devote to your wellness). And if you want to get worse, do nothing!”

Foam Rolling at NIFS

NIFS has multiple foam-rolling stations designated to give you as many opportunities to roll as you need. There are multiple lengths and densities as well as a specialty roller made by Rollga. If you would like a quick tutorial and to talk about foam rolling with staff, please stop by the track desk and see one of the Health Fitness Specialists on staff. Get on a roller today, feel great tomorrow!

Evolve and rejoice

Like what you've just read? Click here to subscribe to our blog!

This blog was written by Thomas Livengood, devoted NIFS Health Fitness Trainer and Manager and avid blog writer. Missed by his NIFS family and members.

Topics: fitness center Thomas' Corner injury prevention pain mobility foam rolling circulation

Get a Handle on Fitness with TRX at NIFS

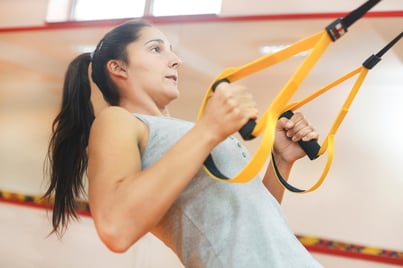
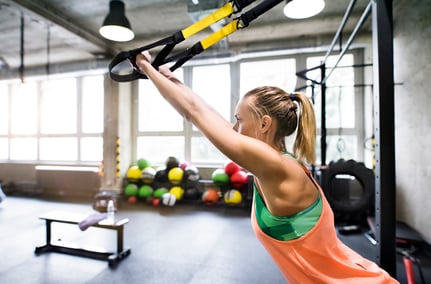
GettyImages-501890636Have you tried TRX class at NIFS? For starters, you may be asking yourself, “What is a trx?” TRX is a body-weight suspension training system designed to give you a total-body workout, while playing to your skill set and allowing for nearly limitless body-weight–oriented exercise. TRX can provide a fitness beginner with an opportunity to learn movement patterns properly as well as challenge the most seasoned veterans in the gym with more advanced progressions.

The TRX concept is fairly simple: it’s basically two handles and straps that attach at an anchor point. Some exercises require various strap heights, but really, you can do most basic movement patterns (squat, row, and press) with one of three lengths. Intensity of exercise is determined by angles of your body as opposed to the anchor point, stability and balances, and progressions. The TRX was designed in the mid ’90s by Randy Hetrick, a former Navy Seal, as a way to develop total-body strength through body-weight–resisted exercise.

Getting Started

The first thing you notice when you see a TRX on the fitness center floor is that there are not many instructions on how to use it, although there are actually quite a few. A great way to become acclimated to some of the exercises is to take a TRX class, which is complimentary with your membership. A typical class consists of a warm-up or acclimation to TRX. We spend time every session practicing strap adjustment and proper form. Then we get down to business. Every exercise has a progression and a regression to ensure you are getting a workout appropriate to your abilities.

It is not uncommon to see a college student working out side-by-side with a grandmother. Although the variation changes slightly, the overall goal is to work to get better each and every time we train. At the end of each session there is time to stretch. Stretches are many people’s favorite, not only because you know you are finished, but also because it really feels good and works.

Exercises You Can Do on Your Own

As you await your next TRX class opportunity, here are some exercises that you can add to your own workout in the meantime.

  1. GettyImages-651469910TRX Row: With two handles set to the short length (one tick mark), start with arms long and body in a plank position, being mindful that you do not let your hips sag. While under control, pull yourself up to your hands. Lower back down under control. PRO TIP: You can pull with your hands parallel to the floor to engage the lats more, whereas pulling with your hands horizontal to the floor works the rear deltoids and trapezius. (See video here.)
  2. TRX Superman: With two handles set to the longest length, start facing away from the TRX. Your arms will start out by being fully straightened. By simply leaning forward and moving your hands toward the ceiling, the core control will be emphasized. PRO TIP: Being under control is always key, but you also what to start from a position in which the exercise is doable. Try moving your feet farther away from the TRX to make this exercise harder, or closer to the anchor point to decrease the difficulty. (See video here.)
  3. TRX Assisted Pull-ups: Start with two handles set to the shortest position (if you need assistance with adjustments, please see staff at the track desk) and body positioned directly below the anchor point and sitting in a cross-legged position. Use the TRX handles to slowly pull your body upward, not unlike a real pull-up motion. The assistance comes from the lower body and the resistance and difficulty can be determined by tempo and number of repetitions. (See video here.)

Try This Workout

5 Minutes AMRAP (as many reps as possible)

  • 12 TRX Rows
  • 12 TRX Superman Extensions
  • 6 TRX Assisted Pull-ups
  • Repeat

TRX at NIFS

Although class space is limited to eight individuals, there are no sign-ups. Just show up and enjoy a great, challenging workout. If you are having reservations about joining the class, but still want to try TRX, one of our certified fitness professionals can prescribe exercises. Classes meet Monday at 6am, Thursday at 5:30pm, and Friday at 6 and 11am. Check out the NIFS Group Fitness page to see up-to-date times and days for your favorite classes. Get a handle on fitness with TRX today!

Like what you've just read? Click here to subscribe to our blog!

This blog was written by Thomas Livengood, NIFS Health Fitness Instructor and Personal Trainer. To read more about the other NIFS bloggers, click here.

Topics: NIFS fitness center Thomas' Corner group fitness TRX body weight total-body workouts

A Spoonful of Fitness: Should You Work Out When You’re Sick?

GettyImages-674772578-1Have you ever woken up feeling like a truck ran you over? This might be due to an underlying illness; whether it be a cold, flu, bronchitis, or some other bug, it seems to happen to everyone at least once per year. When it comes to fitness, we sometimes have to make a choice: “Should I work out or should I rest?” The answer to this is not as cut and dried as it might seem. We’ll look at when it’s a good idea to stay home and chill and when you can just “sweat it out.”

Making the Call: Should I Cancel My Workout?

Sometimes just keeping up with your daily routines can help you feel better, especially as you move through the day. You might even pick up energy from exercise and activity instead of staying idle at home. A few guidelines dictate whether you should green-light a workout. According to experts, a major factor to consider is body temperature. Having any kind of fever is an immediate red flag, especially at more than 101 degrees. Another obvious red flag is if you are unable to keep fluids down. Anytime you are dehydrated, your body does not function at peak capacity. Here are some additional ideas to help make the decision.

Going Back to Working Out After Being Sick

When you feel like you are ready to go back to the gym, try to ease into your workout. Your body (namely your T-cells) has been fighting a battle. A quick assessment of your symptoms should give you a good indication of whether you are good to go. Temperature, fluids, and blood pressure are all surefire ways to draw that line in the sand.

How to Keep from Getting Sick Again

Finally, you should hopefully, at this point in your life, understand the importance of illness prevention—not only for you, but also for those around you. The routine of washing hands wasn’t widely practiced until about 150 years ago when a Hungarian doctor named Ignaz Semmelweis discovered that when his crew washed their hands between patients, the number of diseased and dying patients dropped off immediately. The long forgotten disease, puerperal fever (sometimes known as childbed fever) was nearly eradicated by simply implementing a hand-washing regimen. Today’s world allows almost endless opportunities to not only transmit illness, but also prevent them. Enough history lessons, though. You get the point: wash your hands often, please.

Ask for Help from the NIFS Staff

NIFS staff can help you in a number of ways, especially when deciding whether exercise is right for you when you are not feeling well. Blood pressure monitors, both electronic and manual, as well as an oxygen sensor are available to all members. A well-stocked first aid kit and a staff well versed in first aid and safety are also on your side. Always remember, your workout is important, but your health is priceless.

Muscleheads evolve (and rejoice)

Like what you've just read? Click here to subscribe to our blog!

This blog was written by Thomas Livengood, NIFS Health Fitness Instructor and Personal Trainer. To read more about the other NIFS bloggers, click here.

Topics: fitness center Thomas' Corner nifs staff workout illness oxygen illness prevention handwashing

Back to Exercise Basics: The Hip Hinge

In my previous “Back to Exercise Basics” posts, I broke down the push-up and then the squat, focusing on the individual aspects that form a properly performed fundamental movement. Now it’s time to take a look at the movement pattern that is considered by many to be the granddaddy of all movement patterns: the hip hinge.

Most movement in athletics (and in life) stems from a hip hinge. It is a base position that is the ultimate power generator. The hinge can be found in most movements and is a super important position and pattern no matter who you are and what your athletic event is, sports or life. Quite often, many individuals confuse the hinge with the squat; and although they are both lower-body movements, they couldn’t be more different. This confusion between the two generally leads to “squat-heavy” kettle swings, poor positioning for a deadlift, and lackluster power expression.

How the Hip Hinge and Squat Differ

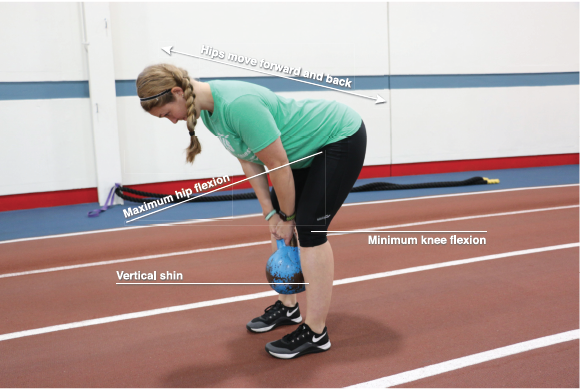
So if you can live with my stick-figure drawings, take a look at how these movements are different:

Cara_hinge

HIP HINGE

  • Max hip flexion with minimum knee flexion
  • Hip dominant
  • Hips go back and forward
  • Vertical shin

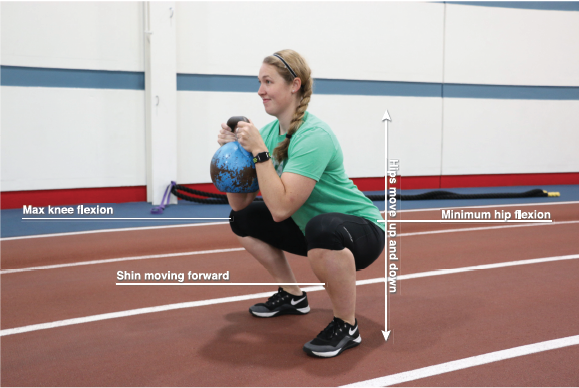
Cara_squat_kb

SQUAT

  • Max knee flexion with minimum hip flexion
  • Quad dominant
  • Hips go up and down
  • Shin moves forward

The differences between the two should be pretty clear when looking at them side by side, even with these crude drawings.

Videos: How to Master the Pattern

But the hip hinge can be one of the toughest things for a coach to teach, and a tough pattern for a new mover to perfect. Of course, using an FMS to evaluate your ability to perform a hinge pattern is a key first step. But after that, how can you master this pattern? Here are a few drills that can set you up for success, as well as some variations of a hip hinge that you can add into your current program.

VIDEO #1: Set It Up

  • Karate-chop hips—Rock and lock—Charlie
  • Short-stop hand slide
  • Broad jump freeze


VIDEO #2: Grease the Pattern

  • Wall butt touch
  • Band distracted hinge
  • KB front-loaded hinge
  • Foam roller single-leg hinge


VIDEO #3: Variations

  • KB deadlift
  • Hip thruster
  • SaB deadlift
  • Landmine single-leg/straight leg/Deadlift


Just as with the push-up and the squat, we are merely scratching the surface here of both the position and the breakdown of the hinge pattern and the many ways to use and improve this ever-important fundamental pattern. But I feel good that the information covered here can at minimum get you underway toward being a hero for the hip hinge.

Get More Help from NIFS

Want more tips and information? Schedule a personal workout plan appointment with a NIFS instructor and cover cutting-edge drills and techniques to make you the best mover you can be.

Like what you've just read? Click here to subscribe to our blog!

This blog was written by Tony Maloney, ACSM Certified Exercise Physiologist and Fitness Center Manager. To find out more about the NIFS bloggers, click here.
Topics: NIFS fitness center functional movement functional movement screen exercise basics hips

Are You Ready for Fitness Change? Meet the NIFS Trainers Who Can Help

BarreChange is scary. Getting in a comfort zone, routine, or pattern is easy. But why is change for success so trendy nowadays? This applies to all areas of life. Change your diet habits and you start to “magically" lose weight. Change your workout routine and you start to “magically" see results. Change your spending habits and you start to “magically” save more. Change your mind and commit, and you realize change isn't scary; it’s successful.

Use Change to Make Changes

I have worked at many fitness studios and gyms, tried many fitness trends and challenges, and been given crap when I tell clients we are doing something different today. But then I explain why and it changes their minds. I'm a firm believer in giving it a chance. You can try something new, and if it doesn't work or you don't like it, we can always change it back to what it was. 

I started at NIFS not realizing how much they change the workouts to keep creating beneficial results. I was prepped to manage a typical gym where trainers just keep making you pick up the same weights, do the same motions, and make you do something you “hate” to make it seem like the workout was hard and make bank off that concept. The NIFS program changes weekly. You’re set on a four-week plan, but the staff varies your workout routine in that time by changing your sets, reps, and weights. Then by week 5, there is a new plan, new changes, new results, and new continued growth.

Here are some examples of the experiences and results you can get from working with various members of the NIFS staff:

  • Take a small group training class from Mike or Alex, guiding you through this process with motivation to make it easy.
  • Take a Barre class with Rachel and she uses the same concept with a gentle tone, breath cueing, and education as to why your muscles might start shaking in temporary discomfort the way they do: because they are changing; because they are growing stronger!
  • Try a program challenge with Jessie, and you’ll see that the success stories of members we put up on the Brag Board who are excited to share their accomplishments are truly amazing. It's because they weren't bored doing the same thing weekly. The variety created results, change, strength, and an awesome brag-worthy story.
  • Weight loss is another common goal for members, and we have a program specifically for that with Lindsey. Did you know that more than 50 percent of her day is spent with members who are accomplishing weight-loss success with her guidance? She plans fun meet-ups and gatherings so her clients don't lose track of their goals with the common "weekends don't count" excuse. 
  • Thomas might arguably have the hardest job out there. "My TV channel isn't working,” or "This machine is broken,” are just a few things I have heard members say to him. Within 24 hours, I bet it has been fixed. Because Thomas cares about the members’ happiness—whether that's watching their favorite show or working out on their favorite machine—he is the handyman of the team. Feedback is his cue to grab the toolbox and take action.

Teamwork Does Make the Dream Work

With a wide variety of options, there is always something for everyone. As a team, we don't let change hold us back. We teach our clients that change creates results. We all practice change daily and are never doing the same thing at our desks, but we’re creating programs, events, or requests that will change a member’s experience to be the most beneficial. So are you ready to change your mind, change up your routine, and achieve your goals? There are endless options. Find a place to start and follow through. We are here for you! 

Like what you've just read? Click here to subscribe to our blog!

This blog was written by Brittany Ignas, BS in Kinesiology, 200 Hour Yoga Alliance Certified, Stott Pilates Certified, and Fitness Coordinator. To find out more about the NIFS bloggers, click here.
Topics: fitness center weight loss nifs staff making changes barre small group training teamwork

I Don’t Always Use a Machine: The Athletic Training Platform (ATP)

In the great pursuit to build a strong body, push through preconceived physical boundaries, and feel great, we are in a time when the training options are close to limitless and at our fingertips. The world of strength and conditioning is full of pros who develop new ways everyday to challenge the human body and create systems and tools designed to push athletes and fitness enthusiasts to new heights. Many of these tools and training systems should stay in those late-night infomercials, but every now and again someone gets it right.

Louie Simmons of Westside Barbell (WSB) nailed it with the development of the Athletic Training Platform (ATP). Premiering about a year ago, the ATP was designed as a universal training machine suited for all fitness levels and many applications for anyone working to get fit, build strength, lose weight, and build a powerful body. We here at NIFS were fortunate enough to acquire one of these great machines recently, and we feel it definitely lives up to the hype.

Setting Up the ATP

So how do you get started using this piece, you ask? Here is a quick tutorial on proper setup of the ATP.


When working with folks, it’s my belief that first you need to master your body with body-weight movements and functional movement patterns; move on to loading those patterns with dynamic equipment such as kettlebells and sandbags; and finally progress to more advanced and multi-joint movements. I typically do not use many machines in my personal or professional training other than a cable system. The ATP is a machine I can get behind and use frequently. The ATP is used for so much more than just belt-squats; it can challenge anyone in any plane of motion. It can also help with lower-back ailments due to its “traction” effect with the load coming from below.

Favorite Exercises

There are too many exercises to list in one post, so here are a few of our favorites:


You intrigued? You should be! The ATP is a versatile and effective piece that can help you achieve the fitness goals you have set for yourself. If you are interested in adding the ATP to your exercise program, I highly recommend that you see one of your highly trained and motivated instructors here at NIFS to show you more about the ATP. Stay tuned for more ATP exercises coming soon in future posts!

Like what you've just read? Click here to subscribe to our blog!

This blog was written by Tony Maloney, ACSM Certified Exercise Physiologist and Fitness Center Manager. To find out more about the NIFS bloggers, click here.

Topics: NIFS fitness center equipment videos Athletic Training Platform

Back to Exercise Basics: The Proper Push-up

In our current state of fitness, many folks are continually looking for the next best exercise, program, or intense challenge. My challenge to you is to return to the basics, perfect those, and then explore the possibility of increasing the difficulty or completing some monster challenge. Gray Cook says it best: “Don’t add strength to dysfunction; move well and then often.” Translation: stop jumping right to something you are not prepared for just because you viewed it on “insta.” I challenge you not to focus on and post epic exercise fails, but to post a video of someone performing a stellar squat, a pristine pull-up, or the proper push-up.

A Full-Body Exercise

The push-up is easily the most versatile and effective exercise in the vast movement library in fitness and health. Challenging spinal and core stability, upper- and lower-body endurance, and strength, the push-up, done correctly is truly a full-body exercise. A great push-up starts with a strong trunk, so start there by improving your planks and hip bridges to strengthen the entire system.

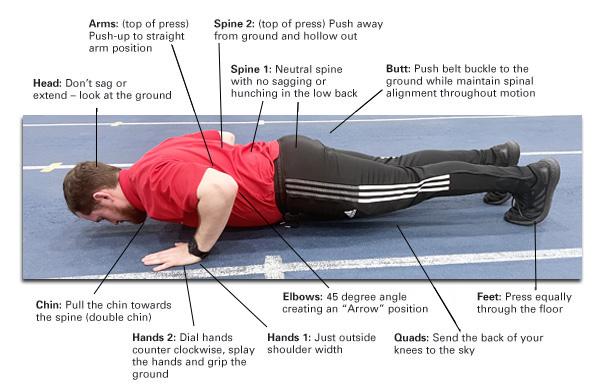
Proper Pushup_David

Push-up Checklist

Next, consult the following checklist to perform your best push-ups, and learn some variations to both assist and challenge yourself.

  1. Spine 1: Neutral spine with no sagging or hunching in the low back.
  2. Spine 2 (top of press): Push away from the ground and hollow out.
  3. Head: Don’t sag or extend—look at the ground.
  4. Chin: Pull the chin toward the spine (double chin).
  5. Hands 1: Just outside shoulder width.
  6. Hands 2: Dial hands counterclockwise, splay the hands, and grip the ground.
  7. Elbows: 45-degree angle creating an “arrow” position.
  8. Arms (top of press): Push-up to straight-arm position.
  9. Butt: Push belt buckle to the ground while maintaining spinal alignment throughout motion.
  10. Quads: Send the back of your knees to the sky.
  11. Feet: Press equally through the floor.

Like what you've just read? Click here to subscribe to our blog!

This blog was written by Tony Maloney, ACSM Certified Exercise Physiologist and Health Fitness Instructor. To find out more about the NIFS bloggers, click here.


Topics: exercise fitness fitness center endurance strength core movement push-ups

Six Reasons to Join a Gym or Fitness Center

“I don’t need to join a gym; I work out at home.”

“I have videos I watch when I want to work out.”

Do these things sound familiar? I hear it from people I talk to all the time. There is a place for everybody at the gym; and in fact, there are many good reasons that you should join one! I am here to give you the top six reasons why you should join a gym or fitness center.

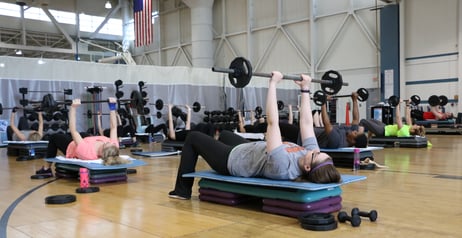
Bodypump

1. Community

When you join a gym and you go at the same time each day and each week, you start to see some familiar faces. The gym has one of the best communities around that you can be a part of. Everyone is welcoming and working toward the same goals: to get fit in some way or another. It is an encouraging and motivating place to exercise. And I know from personal experience; some of the individuals I have worked with have met lifelong friends at the gym.

2. No Distractions

At home, there can be many distractions to interrupt your workout. Your dog licking you in the face while doing pushups, the laundry buzzer going off in the middle of your yoga, or someone knocking on your door in the middle of your squats can all be frustrating and get you out of your workout groove. Luckily, the gym doesn’t have any of those distractions (sadly, no dogs). You can get your workout accomplished in peace without the potential of having 100 other things get in the way.

3. Accountability

As I mentioned in the “Community” section, when you join a gym and go at the same time every day, you usually start to see some familiar faces. If you do not come for a while, they will question where you have been, and possibly will even call you to check in and see if everything is going okay. The gym environment, from personal training to small group training, helps to hold you accountable for coming into the gym. No one wants to hear, “Hey, I haven’t seen you lately,” when they walk into the gym. The relationships you build with other members and the staff help hold you accountable for your health and fitness goals.

4. Friendships

Some of the best friendships start in the gym. This is something that you won’t encounter if you stay at home for your exercise. Asking someone for a spot or joining a class is a great way to kindle a friendship that may end up lasting a very long time. Good workout buddies are hard to find, but a good place to look for one is in the gym.

IMG_8459

5. Trainers

At home, you may have a video telling you what to do and taking you through a workout, but at the gym, you get the real thing. Whether you are in a personal training session, a group fitness class, or just taking advantage of the trainers walking the floor, there are fitness experts around who can answer your questions.

6. Fun

The gym is a fun place to work out. Who doesn’t want a little more fun in their life? Some people claim that exercise is not fun; I totally disagree with that statement. There are plenty of ways to make exercise fun. Come into the gym and find out for yourself! This is not to mention the fact that the plethora of equipment available to use at the gym is much more than what you typically have at home.

Come try the gym today. We’d love to have you experience all of the six things listed above. Try us for free for 7 days! Click here to find out more.

 Like what you've just read? Click here to subscribe to our blog!

This blog was written by Kaci Lierman, Personal Trainer and Health Fitness Instructor. To read more about the NIFS bloggers, click here.

Topics: fitness center accountability personal trainer gym join a gym