<img height="1" width="1" style="display:none" src="https://www.facebook.com/tr?id=424649934352787&amp;ev=PageView&amp;noscript=1">

NIFS Healthy Living Blog

7 Tips for Safe Outdoor Workouts

GettyImages-1087128992Taking my workouts outside is an easy way to soak up the benefits of nature and switch up my normal gym routine. That being said, I understand that exercising outdoors isn’t exactly the same as exercising inside, and there are some necessary precautions I always take into consideration when completing my outdoor workout.

1. Map My Route Ahead of Time

I am probably the worst person to ask for directions. The GPS was invented for people like me, and I am so thankful to have one with me at all times (thanks to my phone!). Whether I am going for a jog, bike ride, or walk, or completing an outdoor circuit workout, I always make sure to plan my route ahead of time (so I don’t get lost) and show someone else the route I will be taking. This way, if I do get lost or injured, or am not home when I expected to be, someone knows where to find me.

2. Bring My Cell PhoneSprigs_Wrist_Band
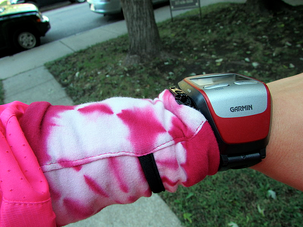
Yes, it’s cumbersome and I would prefer to feel “free” and not have it with me while running outdoors, but I know that if I were to fall, or get lost, or for some reason I wasn’t able to make it back home, I could give someone a call to help me. I keep it in my Sprigs Banjee Wrist Wallet so I can listen to music or a podcast, or I keep it in my SPIbelt. Either way, it allows me to keep my hands free. I also have an ICE (In Case of Emergency) number in my phone. I have heard that emergency professionals are trained to look for an ICE number in cell phones to notify a loved one in an emergency situation.

3. Carry an ID

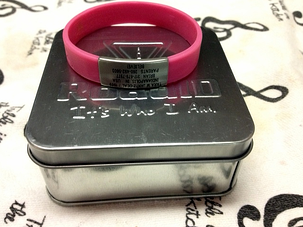
I always carry an ID with me, but that doesn’t mean I always bring my driver’s license along. My Road ID bracelet is the perfect running accessory that contains my name, my husband and parents’ names and contact information, and my age—all important things “just in case” there is an emergency. I love that it is on my RoadIDwrist and I often forget I am wearing it because it is so lightweight and comfortable.
4. Beware of Dogs

Recently, a coworker and fellow NIFS employee who is a runner informed me that one of her friends was attacked by a dog while running. Hearing her story really got me thinking, because luckily I have not come into a negative encounter with a dog while running. Here are some canine safety tips I keep in mind when running and exercising outdoors:

  • Do not run from the dog; this can stimulate the animal.
  • Stand perfectly still with hands and fists close to the body.
  • Don't yell or say anything.
  • Don't look the dog in the eye; this can be threatening.
  • Do not use mace on an animal; it is not strong enough and will upset it more.

5. Wear Reflective Gear

When running in the evening or in the early morning while the sun is rising, I always make sure to wear some sort of reflective gear. I prefer to choose clothing that has the reflective gear “built in,” but you can easily purchase reflective vests to wear over your clothes. Wearing reflective gear makes it easier for cars and bicyclists to see me when I am coming their way, which makes me safer while getting my outdoor workout on.

6. Check the Weather

The weather often dictates whether I take my exercise outside or keep it indoors. If it’s raining, chilly, or super hot, I will opt for an indoor workout. That is, unless I am training for a race. Often when I am training for a race I will head outside to train in less than ideal conditions. Exercising in the elements may seem intimidating, but when I am dressed properly I can go out in all kinds of weather! When dressing for cooler weather, I always layer my clothing. This helps trap the heat in and gives me the option to get rid of some clothing articles if I get too warm. That being said, if the roads are dangerously icy, if a rain storm brings thunder and lightning, or if there is a heat warning I will always pick safety first and move my run to the indoor track or treadmill.

7. I Don’t Blast My MusicTara_ipod
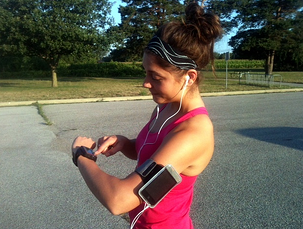
I love listening to music and podcasts while I run and exercise because they really help me enjoy the workout even more than I already do. While I love listening to my music and podcasts, I make sure not to blast the music so I can hear oncoming cars, people, bikers, and anything else that I may not be expecting to come my way. I know how easy it is for me to “get in the zone,” but I try to stay as alert as possible when exercising outdoors, especially if I am not with a buddy.

What are some of your tips for staying safe during your outdoor workouts? Share them here.


This blog was written by Tara Deal Rochford, NIFS Membership Manager and a group fitness instructor. Author of Treble in the Kitchen. Meet our other NIFS bloggers.

Topics: running walking equipment cycling half marathon injury prevention circuit workout outdoors safety

“Alice & Chains” Part 1: What Is Functional Training?

My mission today is to save Alice from the Wonderland of what some refer to as functional training. I will attempt to rescue dear Alice (aka you all) with the use of chains—kinetic chains, that is. First, I would like to define a few buzzwords to clear the fog that settles in this functional wonderland.kinetic chains

Functional What?

I am sure that most of you have heard the term “functional training.” If you have not, you may still have a poster of Lee Haney hanging in your locker and you are counting the seconds until your next “chest day.” I will be the first to admit that I was that guy. At the time, that is what we knew, but we now know a better way of doing things—a safer, more “functional” way.

But we do not want to throw the baby out with the bath water here. We still see a lot of theory and practice from that time in the evolution of fitness. Unfortunately, if you asked five different people (fitness pros and gym goers alike) you would get five different answers of what functional training really is. If we were to dissect the term, and I think we should, the simplest and most accurate definition of functional training is to train or restore function in movement. There are many ways to go about training or restoring function. We are going to
focus on the concept of using kinetic chains to do so.

Kinetic Chains

Kinetic chain is another term that needs defining. Let’s dissect this term, shall we?

(Kinetic = Movement) + (Chain = Linkage) = Linking movements to perform a pattern.

Human movement can be broken down into some basic patterns (a concept that will require a lot of time devoted to in a future piece), and these patterns are linked together in some way. This is a good thing because if you restore function to one pattern, you could be improving an aspect of another pattern.

We look at the body as having two main kinetic chains: anterior (front side of the body) and posterior (back side of the body). These chains will cross, giving birth to another buzz term: the “X Factor.” So when we focus on training these chains of movement, we will arrive at a more functional operating system. Simply put, train the chains and the body moves better and longer.

What Functional Training Is Not

If we keep the main idea of what functional training is at the forefront, to restore function, here are a few things I would not consider to be a part of a functional training program, just to name a few:

  • Single joint, isolated movements such as a bicep curl
  • Targeting a single plane of motion; standing, lying, moving in one direction
  • Focusing on one area of the body a time per training session, as referenced earlier (“Chest Day”)
  • Balancing on three different objects and performing a kettlebell swing
  • Doing barbell squat presses until you hit the ground; some believe this is “functional”

Scratching the Surface

Using the concept of kinetic chains, I have been able to give Alice (you) a sense of direction to navigate through the Functional Wonderland. But I have only scratched the surface. Keep your eyes open for Chapter 2 of our story in a future post, where we will tackle movement patterns and how to train them.

Don’t know how you are moving? Schedule a Functional Movement Screen with us today and start getting the most out of your training.

New call-to-action

This blog was written by Tony Maloney, ACSM Certified Exercise Physiologist and Health Fitness Instructor. To find out more about the NIFS bloggers, click here.


Topics: NIFS fitness center workouts functional training injury prevention muscles

Thomas’ Corner: Shin Splint Showdown

March can be a good starting point for goal setting and modifying resolutions (not to mention contemplating the time we have until swimsuit weather arrives). Regardless of individual intentions and goals, starting a new routine, becoming a regular at the gym, not properly warming up and cooling down and breaking in new sneakers all have one nagging issue in common: shin splints.shin splints

What Is a Shin Splint?

A shin splint is described as pain in the lower leg and is typically located on the front, inside portion of the shin bone (tibia). Some individuals experience tenderness, numbness, and even throbbing in the affected area. The pain usually lasts only during exercise and will go away when we are at rest.

What Causes Shin Splints?

Shin splints are mainly caused by running form, running on hard surfaces, overuse/overtraining, nonsupportive shoes, and genetics (flat feet). While the best treatment for shin splints remains simple rest, it is permissible to exercise if proper post-exercise treatment is administered. This treatment includes icing the shin and keeping it elevated for 10 to 15 minutes after your exercise session.

Preventing Shin Splints

Shin splints are treatable and preventable. Do not let them beat you in your quest for fitness and wellness prosperity. Take the necessary precautions and be aware of how your body is responding to your training. For expert advice on footwear, ask your family podiatrist or footwear professional. You can also help your cause by avoiding running on hard surfaces, adjusting workout intensity to a gradual increase (instead of “no pain, no gain” mentality), and making sure you are wearing proper shoes that fit your foot type.

Stretches For Preventing Shin Splints

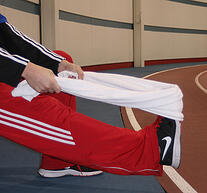
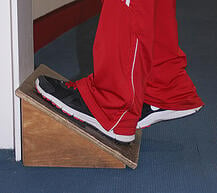
shin spint stretchshin splint stretchFor shin splint prevention, begin a stretching routine that includes standing calf stretches (shown to the right using a slanted service), Achilles tendon stretches (shown using a towel for better range of motion), as well as a well-rounded dynamic warm-ups.
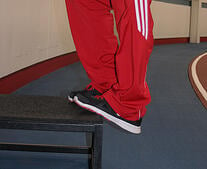
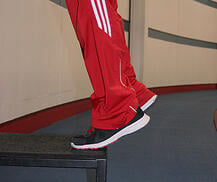
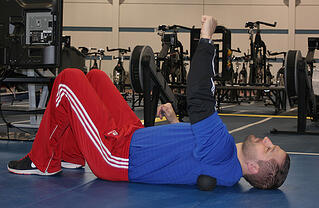
It is also important to strengthen the muscles in the lower leg with toe raises and toe presses (shown below using a step).

shin spint stretchshin splint stretch

Please contact a NIFS Health Fitness Specialist to help you set up exercises and stretches that are appropriate for your fitness level and goals.

Be well, and best wishes!

If you are interested in training for a half or full marathon, NIFS has programs just for you! Contact Stephanie Kaiser for more information.

This blog was written by Thomas Livengood, Health Fitness Specialist at NIFS. To find out more about the NIFS bloggers click here.

Topics: Thomas' Corner running injury prevention overtraining

Thomas’s Corner: Using Tennis Balls for Self Myofascial Release

By now, you may have been to the gym a few times and have seen or even tried using the foam rollers. As we have learned from NIFS Personal Trainer Kris Simpson in her blog, foam rollers are a great way to loosen up the muscles by promoting flexibility, blood circulation, and recovery through self myofascial release. Although foam rolling is great, we can take the self myofascial release techniques a step further by implementing a commonly found piece of fitness gear, the tennis ball (or lacrosse ball).

Differences Between Foam Rollers and a Tennis Ball

A tennis ball or lacrosse ball can be used as a tool for applying self myofascial release to the muscle, similar to foam rolling. Differences between foam rolling and tennis ball rolling go beyond the obvious. Visually, a foam roller is traditionally a cylindrical, foam object and can be rather bulky, which would be fine for large muscle groups such as the glutes, hamstrings, or latissimus dorsi. The tennis ball is much smaller and round, giving it the ability to reach smaller areas and pinpoint tight, sore muscles. This is great news for small-muscle issues, but it is not exactly practical for total body myofascial release.myofascial release

How to Use a Tennis Ball for Self Myofascial Release

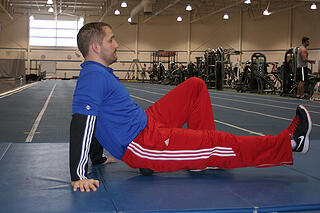
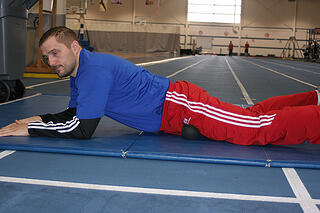
Some examples of areas on which I like to utilize a tennis ball or lacrosse ball(pictured) include the hip flexor, the glute, and the shoulder blade. Follow these steps:

  1. Rest your body weight (as much as you can handle) on the tennis ball.
  2. Support yourself with your opposite-side leg and foot or with your upper body (depending on the areamyofascial release you are targeting).
  3. Then, roll over your target area, pinpointing and triggering muscles that otherwise may have been missed by the bigger foam roller.

Foam rolling and tennis ball rolling intensity can be determined by increasing or decreasing the size, shape, and hardness of the tool. The various tools you bring to the table will ultimately determine the experience you have with myofascial release.

myofascial release


If you are new to self myofascial release or want to experience some new rolling techniques and tips, meet with a NIFS health fitness specialist or personal trainer to get started on your way to wellness excellence. A more fit day is right around the corner.

Like what you've just read? Click here to subscribe to our blog!

This blog was written by Thomas Livengood, Health Fitness Specialist at NIFS. To find out more about the NIFS bloggers click here.

Topics: NIFS Thomas' Corner shoulders injury prevention muscles flexibility stretching

The Functional Movement Screen (FMS) at NIFS

Over the last several weeks a lot of you may have gottenFMS logo
a small taste of our new movement screen. The Functional Movement Screen (FMS) will be our new way to assess movement-pattern quality. Movement training is somewhat new and looks at fundamental movements and motor control rather than isolated joint movements. Its purpose is to find dysfunctions so that they can be rectified and your chance for injury decreases.

The FMS Movement Tests

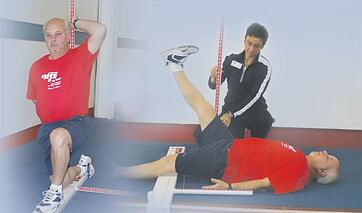
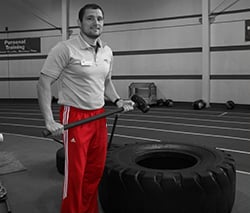
The FMS is made up of seven movement tests that can be divided into three sections. There are two tests that measure mobility, two tests that measure stability, and three tests that measure function. All of these tests coincide with each other so that we don’t miss anything. If you can FMS screeningmove pretty well at one test, it will eventually find a restriction or asymmetry/imbalance at some point if you have any. Our job is to identify any weaknesses, limitations, imbalances, or asymmetries so that we can immediately prescribe you a corrective strategy to reduce your chance for injury and increase fitness results.
Increasing Fitness Results and Reducing Injuries

As a staff, we are always looking for ways to improve our members’ safety and training, and our effectiveness to get results. Having a reliable way to assess movement allows us to program specifically for your needs and really zero in on what you need to achieve the best results. One of the reasons people hit plateaus is because their movement restricts how much they are able to do. So the FMS helps build a functional platform so that you can first move well and then move often. Essentially, if you try and move often first before you move well, your chance for injury goes up and your chances of seeing major results go down.

Scoring the Functional Movement Screen

Each test is graded from 0 to 3. A 0 indicates that there is pain during that specific movement. A score of 1 indicates that there is a dysfunction and the chance of injury greatly increases. A score of 2 is acceptable, and a 3 is considered optimal movement. A scoring system helps know whether the program we are prescribing is working and shows you specific results. The bottom line is if you are moving better, the chances of you getting injured are going down and your ability to get results is going up.

Modifying Training Based on FMS Scores

Lastly, if there is a dysfunction present, it is our job to put you in the best possible position to succeed and to stay injury free. This means that we will modify your training to correct your dysfunction as quickly as possible so that you can get back to the things that you are used to doing, but doing them more efficiently. If you are tired of not seeing results, the path that you continually take isn’t working.

Let us help you by taking you through the FMS, taking a step back from your misguided approach, and working on the small things that will help you achieve big results. Learn more about the FMS at NIFS, and sign up today!

This blog was written by Josh Jones, MS, CSCS, USAW, FMS. Meet our NIFS bloggers.

Topics: fitness center functional training shoulders NIFS programs injury prevention muscles range of motion

Quick and Easy Ways to Improve Performance: Taking a Deload Week

Just so that we are clear, deloading is when you reduce the volume, intensity, or frequency of training for a specified length of time. For many athletes, thinking of taking a deload week can sometimes be difficult. They are either in a groove that they don’t want to mess up, or the fear of losing too much strength or momentum can outweigh their decision to lighten up for a week. The reality of it is that they could come back the following week refreshed and more motivated than ever to reach their performance goals.

When utilizing a deload week, it canweight lifter
sometimes be difficult to understand when to take advantage of it and how to modify your training so that you can come back fully recovered. Your training age, strength levels, and injury history will determine how often you need to take one. The higher your training age, the stronger you are and the more weight that you can lift. If you tend to be injured a lot, a deload week is more important if you want to be successful. 

The three weeks hard, one week deload idea is something that I have added to my programs and have gotten great results from, as well. I use a four-week block system. Depending on where they are at (think off-season or in-season) will dictate if they deload at the fourth week or the eighth week.

Here I outline some general guidelines so that you can take your training and performance to the next level.

Reduce Training Volume

My first recommendation is to drop the total training volume to 60 to 70 percent of what was originally planned. To make things easy, if you had 10 total sets planned, you would only do six to seven total sets for the training session.

Reduce Training Intensity

My second recommendation is to drop the intensity to 60 to 70 percent. So here you would calculate your one-rep max (RM) and work up to only 60 to 70 percent of that 1RM. Let’s say that your bench press is 200 pounds. Then the highest weight that you would lift for the day would be anywhere from 120 to 140lbs. You can reduce both volume and intensity if you are really feeling under-recovered. In this example, if you had 4 x 5 at 80 percent of 200, you would do the following: 

70% of 4 sets = 2.8
(so you would round up and do 3 sets instead of 4 sets)
Instead of doing 80% of 200, which is 160, you would complete 70% of 200, which is 140.
The athlete now would do 3 x 5 at 140 instead of 4 x 5 at 160.

Take Some Days Off or Reduce Training Frequencyfitness calendar

The other option is to take a couple of days off or reduce the training frequency. So if you normally train five times per week, maybe come in for three days that week while dropping your volume and intensity to 60 to 70 percent. On the days off, you could incorporate some active recovery, which includes some cardiac output training (keep heart rate between 120 and 150) to help stimulate recovery, or even a mobility circuit. Again, if you are feeling very under-recovered, it might be best to take the day off completely.

Recovery

The biggest benefit from taking a deload week is to give your body a chance to fully recover so that you can stay healthy and come back refreshed and eager to train even harder. The recovery process is just as important as the training process. If you can’t recover properly, that is going to set you up for injuries. 

If you take only one thing from this post, let this be your warning: Don’t wait for something bad to happen that forces you to take time off. Incorporate a deload week as part of your training program so that you can stay healthy longer. Hopefully this post gave you good insight about how to deload properly, stay healthy for a long time, and improve overall performance.

This blog was written by by Josh Jones, MS, CSCS, USAW. Learn more about the NIFS bloggers.

Topics: fitness center workouts injury prevention muscles strength safety

Thomas’ Corner: No Pain, No Gain?

thomas

“No Pain, No Gain.” This motto has been forever linked to wellness and fitness. We know that without a little struggle, there will be no progress, but is it really necessary to “bring the pain?”

We do know that when we workout, we create muscle soreness. This is, in part, due to overload of the muscle during exercise or even creating very small tears in the muscle fiber. There is good news though! Your body will repair these muscle tears and become even stronger, allowing you to better handle the workloads of your future workouts.

A concern does arise, however, if significant and repeated tissue tearing is happening frequently; a severe injury or tissue damage could take place. (See this article for more on the hazards of overtraining.) To prevent this from happening, you can start one of several pre-workout rituals, including foam rolling and dynamic stretching. A post-workout stretching is also equally important followed by good nutrition and adequate rest.

Creating a plan of action with a fitness specialist or personal trainer will help you develop a workout that is appropriate for your goals! Yes there may still be some pain at times but it's the gain you'll remember.

Evolve and rejoice,

Thomas

This blog was written by Thomas Livengood, Health Fitness Specialist at NIFS. To find out more about the NIFS bloggers click here.

Topics: fitness center Thomas' Corner workouts injury prevention overtraining stretching

Injury Prevention: Foam Rolling

Foam rolling is the layman’s term for self-myofascial release. What you are doing is giving your muscles and fascia (the connective tissue that runs head to toe in the body) a good massage. If you have had a deep-tissue massage, however, you know it can be painful. This is the only time in the gym that I recommend no pain, no gain. Now, that may seem masochistic, but a little discomfort on the roller can make a world of difference in how you feel as you move after a session.

How Foam Rolling Works

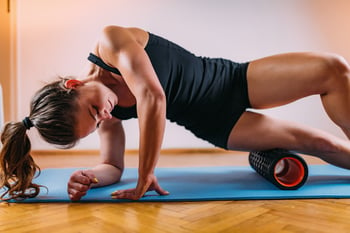
The rollers come in different densities, with softer being gentler. But if you want to break down tight muscles and fascia, you need to need to suck it up and take the pain. Let me explain it this way: When your muscles get stressed, they will tighten up in spots to hold on so they don’t strain or tear. Those spots limit mobility, thus decreasing your ability to move with your max range of motion. When the muscles have been stressed too much, the force will go up or down the chain into the joints (knees, hips, shoulders, etc.). Many times pain is not a result of the joint being damaged; it is from the muscles not being able to do their job.GettyImages-1226237804_web

When you roll on the roller, all those tight spots are the muscles with a little ball, so to speak, of tight fibers. When you roll over those spots, they will release. Over time, with commitment to your rolling, you will feel those spots be less tender and pain will decrease. With a muscle at full strength, you can do more with it in terms of flexibility and strength.

The Basic Foam Roller Exercise

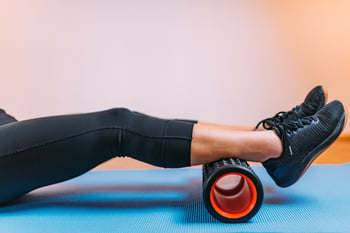
So how is this done? Ideally the body should be warm (although you will break a sweat hitting your sore spots, I can tell you from personal experience).GettyImages-1226237964_web

  1. Grab a roller to lie on. You do want to try and hit the entire body. Surprisingly, you will find other spots you did not realize were sore.
  2. Move your body over the roller, avoiding bones and joints (those don’t respond to rolling).
  3. Make 5 to 10 passes over a muscle (or fascia) and then move to another part of the body.

You can do this after a workout as well to enhance recovery. You may notice you are less sore than when you started—aahh, the body’s way of working things out!GettyImages-1226237758_web

This is great for the day-after muscle soreness you get from a great (or new) workout.

This blog was written by Kris Simpson, BS, ACSM-PT, HFS, and a NIFS Certified Personal Trainer. To find out more about Kris and our other NIFS bloggers click here.


Topics: fitness center workouts injury prevention muscles joint health