<img height="1" width="1" style="display:none" src="https://www.facebook.com/tr?id=424649934352787&amp;ev=PageView&amp;noscript=1">

NIFS Healthy Living Blog

Posture and Fitness (Part 2): Anterior Pelvic Tilt

ThinkstockPhotos-611184084.jpgIn part 1 of this series covered kyphosis (rounded shoulders). Now we move on to another posture issue, anterior pelvic tilt.

What Is It?

Anterior pelvic tilt (APT) is a postural deficiency that results in an excessive forward tilt of the pelvic region. Essentially, it protrudes the abdominal region while creating an excessive lower-back curvature. This postural deficiency can cause one to have lower back pain, more abnormal movement mechanics, and muscle accommodation throughout the body, which we refer to as reciprocal inhibition.

What Causes It?

APT is commonly caused by excessive sitting. While in the seated position, your hip flexor muscles become very tight from being in their shortened position. When the hip flexors become tight, they pull down on the pelvis, which causes a forward tilt. Tight hip flexors also keep the gluteus muscles from firing efficiently, which causes the hamstrings to compensate for the lack of use, which in return causes them to become overworked. (The root cause for tight hamstrings may be anterior pelvic tilt.) APT is also a cause of weak abdominal muscles. The abs become loose and overstretched, which allows the pelvis to tilt forward even more. This may lead to a false conclusion of having too much fat around the abdominal region because your belly tends to stick out farther than what is natural.

Why Is It Bad for Fitness?

APT causes an overextension of the lumbar spine, lack of glute activation, and quad dominance, which leads to compensation patterns and poor exercise technique.

How to Fix It

There is a solution! In order to fix this problem, you must attack the root cause. Most commonly you will need to improve your hip flexibility, which can be done with a variety of hip stretches and proper warmup and movement patterns that I will list below. Once the hips have regained flexibility through stretching, the gluteus and hamstring muscles should be allowed to fire more efficiently. This will allow the pelvic region to rotate back into proper alignment, which will make movement patterns such as the squat and deadlift more comfortable, especially for the lower back. It is also a good idea to strengthen up the abdominal region as this will pull up on the quadriceps muscles, also allowing the pelvis to be pulled back into place.

Muscles to Stretch

  • PSOAS
    Hip stretches: Butterfly stretch, pigeon pose, kneeling hip flexor stretch, etc.
  • Quads
    Quad stretches: Standing quad stretch, kneeling quad stretch, etc.

Muscles to Strengthen

  • Glutes (Gluteus Maximus and Minimus)
    Glute exercises: Hip thrust, squats, etc.
  • Hamstrings
    Hamstring exercises: Straight-leg deadlifts, Swiss ball leg curls, lying hamstring curls
    Anti-extension abdominal: Planks, hallow holds, hanging leg raises, reverse crunches, lying pelvic tilt 

See a NIFS Health Fitness Specialist today if you believe APT may be keeping you from proper exercise mechanics.

Like what you've just read? Click here to subscribe to our blog!

This blog was written by Darius Felix, Health Fitness Instructor. Click here for more information about the NIFS bloggers.

Topics: NIFS fitness muscles stretching strength training glutes functional movement assessments posture glute abs hamstring APT anterior pelvic tilt

NIFS December Group Fitness Class of the Month: PiYo

Piyo2.jpgContinuing with the Group Fitness Class of the Month series, December is upon us and we are highlighting a new class. Hopefully you had the opportunity in November to do a BODYATTACK class. This month we take a closer look at another group fitness class: PiYo. This Beachbody class has been on the schedule for a good chunk of time now, but in case you don’t know what it is or haven’t taken the opportunity to try it, let’s pick it apart a little bit.

A Low-Impact, Fat-Burning Fitness Class

Now, stepping into an even smaller group fitness studio can also be very intimidating, I know, but the faster-paced movements and music in PiYo will hopefully diminish some of those feelings. And for those of you (this was me at one point as well) who feel this is just another stretching class…think again! PiYo takes the muscle-sculpting, core-tightening movements from Pilates and the strength and flexibility benefits of yoga and ties them into one class. Talk about a great combination! And with the ramped-up speed of the different movements, this class includes fat-burning, low-impact movements to help you see results.

My Experience with This Workout

I personally have done a PiYo class to see what it was all about, and allow me to share my experience. I started out with the mindset of this is “just another stretching class,” like I talked about above. Within just a few minutes, I quickly learned I was mistaken. The class moved much faster than I had anticipated, and the movements were quite challenging. I would consider myself to be an active, decently fit individual, with a good amount of flexibility and strength. But some of the moves in PiYo really challenged the flexibility and mobility of my body. And I could see how over time, taking this class would allow a person to actually see measurable results in those two areas.

PiYo_LOGO_Gray_M.jpgPiYo at NIFS

NIFS offers two different kinds of PiYo on our group fitness schedule. PiYo Strength focuses on agility, dance conditioning, athletic training, core conditioning, balance, flexibility, and so much more. Many athletes benefit from this format because of its flexibility, and using the body as full-body resistance. This is a fusion format that moves quickly and powerfully, and creates strength from the transverse abs out. We also offer Pilates/Yoga Fusion, which is a unique class designed to build strength, balance, agility, and flexibility. The moves fit perfectly together to form a class filled with intense choreography that's fun and challenging and will make you sweat. It is a perfect blend of Pilates, yoga, sports stretch, dance stretch, athletics, and more. Don't worry, no previous experience is necessary!

Watch PIYO workout Video

This blog shows what another NIFS Health Fitness Specialist has to say about PiYo. Take some time to try a PiYo class and see what you think!

Like what you've just read? Click here to subscribe to our blog!

 This blog was written by Amanda Bireline, Fitness Center Manager. To find out more about the NIFS bloggers, click here.

Topics: NIFS exercise fitness center yoga group fitness workouts balance strength Pilates core strength Group Fitness Class of the Month PiYo

Steps to Create Your 2017 New Year’s Resolution Training Plan

ThinkstockPhotos-523286853.jpgIt seems nearly impossible that the holidays have crept upon us already! And not just that, but those dreaded New Year’s resolutions that loom over our heads are just around the corner. But with the right plan in place, we can look at those resolutions as something exciting: a reset to get focused and to really accomplish something this year.

The key to not letting those goals slip by you and hit you on the backside is to have a plan in place that sets you up for success and not failure. A good, solid strategy that has been thought through early enough will get you where you want to be.

5 Simple Steps to Your New Training Plan

Here are 5 simple steps to help you set your New Year’s resolution.

  • Figure out your goal. What is it that you really want to accomplish in your health and fitness this year? Take some time to really hash out what you truly want to do. Maybe it’s finally committing to that first half marathon, setting a new PR in your deadlift, or simply being consistent and getting to the gym three times a week. Whatever it is, make sure your goal setting is attainable and realistic.
  • Make a plan. Once you have figured out what is realistic, it’s time to make a plan. Figure out what tools you need in order to be successful and how you are going to do it. For example, do you need new running shoes, a fitness tracker like a Fitbit, or to hire a trainer? Once you have your plan in place, share it with someone. This will help you to stay accountable; whoever you share it with can check in on you to see how your progress is going.
  • Schedule it NOW! Like most things, if we don’t get them on the schedule we might as well just forget about it. Make sure that you set aside time in your weekly schedule so that you are not digging for time each day. If it’s in the schedule you are more apt to do it, so get it in there and don’t make compromises!
  • Get an accountability partner. One of the easiest ways to stay on track is if someone else is checking in on you. Find a person who can be this for you. Maybe it’s your spouse, best friend, or a coworker; or if you are lucky, you can find someone to meet you at the gym each day and don’t let them down! Be sure to fill them in on your goals, your plan, and your schedule.
  • Reward yourself. And I am not talking about with brownies! Once you get into the habit and are staying on track, find something that you reward yourself with. Maybe it’s that Fitbit that you wanted in the beginning but didn’t get, those new running shoes you’ve been wanting, or signing up for a race in another state and making it a mini-vacation. Figure out how to reward yourself for doing what you planned!

Don’t be afraid, and together let’s make 2017’s New Year’s resolutions ones that we will actually achieve!

NIFS Can Help with Marathon Training

If one of those goals that you set is to complete your first 5K or half marathon, we would love for you to come and train with us in our Mini-Marathon and 5K Training Program! Let us be that accountability partner for you.

Minilogo_2017.jpg

FIND OUT MORE ABOUT THE PROGRAM AND GET REGISTERED TODAY!

This blog was written by Amanda Bireline, Fitness Center Manager. To find out more about the NIFS bloggers, click here.

Topics: NIFS goal setting resolutions accountability training workout 5k new year's Mini-Marathon Training Program

Get a Grip on It: Four Powerlifting Grips

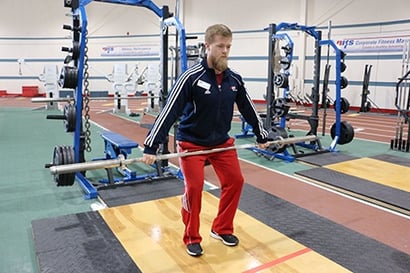
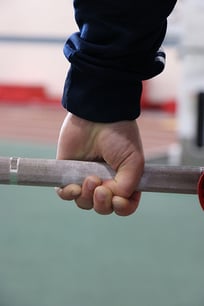
Alex-grip.jpgOne of the most important (and sometimes overlooked) pieces of the resistance training puzzle could be right in the palm of your hands. Have you ever thought about the way you hold onto an Olympic or powerlifting bar? For some, the answer may be no. You may be worried more about other techniques, such as posture or breathing. For others, the answer may be yes. The effort you put into how you grip the bar may be your key to success in lifts such as the snatch, deadlift, and clean, among many other resistance exercises.

But how should you grip the bar? Are you sure that the grip you are currently using is the most ideal for that lift? Maybe a switch of grips is what you’re looking for to break through your current plateau.

Here is a breakdown of four grips and different ways that they can be used in the gym for exercises or other technique purposes.

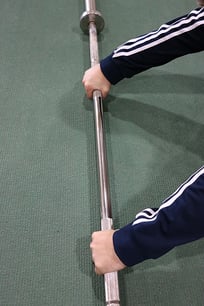
1. Pronated (or Overhand) Gripovergrip.jpg

The pronated grip is generally the most common grip used during resistance training. You place the hand over the bar, dumbbell, or kettlebell with your knuckles up. Your thumb can either be wrapped around the bar (closed grip) or not wrapped around the bar (open or false grip). I would not recommend the open grip because you do not have full control of the bar. The closed grip allows the thumb to prevent the possibility of the bar slipping from the hands, especially during exercises where the weight is held above the body (for example, during pressing movements).

When to use a pronated grip: You can use a closed-pronated grip for pretty much every lift that you perform in the gym. I would recommend this for many of the pressing movements and for stability during the squat.

  • Bench press
  • Shoulder press
  • Barbell squat
  • Basically anything

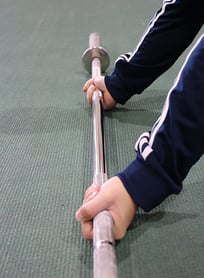
2. Supinated (or Underhand) Gripunder.jpg

The supinated grip is the exact opposite of the pronated grip. The hands are placed underneath the bar so the knuckles aim backward or toward the floor. I generally only categorize the “closed” variation of the supinated grip versus the open/closed options in grip #1. The thumb being wrapped around the bar allows for maximum grip throughout any lift you are performing. I utilize this grip during many of my pulling movements.

When to use a supinated grip: You can use a closed-supinated grip as a variation for many of the main vertical and horizontal pulling movements.

  • Row
  • Inverted row
  • Chin-ups
  • Bent-over row
  • Lat pulldown

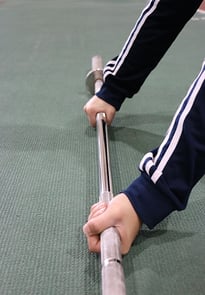
3. Alternated Gripalternate.jpg

The alternated grip is a combination of the preceding two grips. In the alternated grip, one hand is pronated and one hand is supinated. It is common for grip strength to be a limiting factor in your ability to lift heavy weight, especially when performing a pronated grip. The bar tends to roll out of the hands very easily, especially during maximal-effort lifts. The alternated grip places the hands in a more favorable position to prevent the rolling or slipping of the bar from the hands. This is also a useful grip to use when you are spotting someone, especially on the bench press.

When to use an alternated grip: You can use this grip for deadlift variations as well as spotting.

  • Traditional/Sumo Deadlifts
  • Spotting

4. Hook Grip hook.jpg

The hook grip is a nontraditional grip that can sometimes be difficult to master, but could yield great results in terms of the lifts you use it for. It is similar to a pronated grip, but the thumb is placed underneath the middle and index fingers. The benefits of this grip are similar to those of the alternated grip. It prevents the bar from rolling out of the hands because of the placement of the thumb and fingers. This makes it an ideal grip for heavy and explosive movements like the clean and snatch.

I recently finished a new certification course called the CWPC or Certified Weightlifting Performance Coach. This certification is based on two Olympic lifts, the snatch and the clean and jerk. I gained a lot of great information through that course, but one key piece of information that I took away to implement into my own training program was the use of the hook grip. I had previously used a closed-pronated grip for both the clean and snatch, but have switched to the hook grip over the past five weeks. I can definitely see improvement in my ability to grip the bar, but there was definitely a bit of a learning curve.

My main issue was the comfort of the grip itself. It was definitely not pleasant through the first couple of weeks; however, the last couple have been some of the best weeks that I have ever had in Olympic lifting. I feel like I have more control of the bar in my hands, and now I do not have to worry about the bar flying out my hands when the weight becomes challenging. If you can get past the discomfort through your first few training sessions, it will be well worth the switch.

When to use a hook grip: You can use this grip for just about any exercise, similar to the pronated grip.

  • Clean and Jerk
  • Snatch
  • Pullups
  • Deadlift

***

When choosing a grip, go with what makes sense to you. For many exercises, you have a variety to choose from. This just adds more options to your training regimen. By simply switching the grip, you are essentially switching up the exercise as well. Play around with them and see which one feels best!

For more on how to improve your grip strength, see this post.

Source: Baechle, T. R., Earle, R.W. (2008) Essentials of strength training and conditioning (pp. 326-327). Chicago, Illinois. National Strength and Conditioning Association.

Like what you've just read? Click here to subscribe to our blog!

This blog was written by Alex Soller, Health Fitness Instructor. Click here for more information about the NIFS bloggers.

Topics: NIFS weightlifting powerlifting grip strength grip

NIFS Dietitian Reviews Hello Fresh Meal Delivery Service

Hello Fresh Box.jpgWhen I ask people why they don’t cook more, I get a lot of answers. Typically it’s along the lines of “I don’t have time,” “I haven’t been to the grocery store,” “I don’t know what to cook,” or “I don’t know how to cook.” So I was intrigued by the meal delivery service options that are available for individuals who don’t cook as often as they’d like.

Some of the more popular services are Blue Apron, Plated, Hello Fresh, and one local to the Indianapolis area called Fresh Artistry. I had an offer for 50% off my order with Hello Fresh, so that is why I chose to try that one. Here is my experience.

Ordering and Delivery

I went to the Hello Fresh website to sign up. I was able to choose three meals to feed two people (from a selection of six meals) for $35 (originally $70). If I were getting vegetarian choices, it would be a little cheaper, and they also had an option for a family of four. After choosing a beef dish, chicken dish, and fish dish, I was able to pick my delivery date. I chose a Tuesday delivery so I could enjoy the meals during the week when time is short for meal prep.

The box arrived on my front porch with many ice packs to keep the food fresh. Each meal was nicely distributed into its individual boxes, which I appreciated, so I knew which ingredients went with which dish.

Hello Fresh Instruction Card.jpgHello Fresh Ingredients.jpgMaking the Meals

I pulled out the colorful instruction card for the first meal that it suggested I make to guarantee freshness, which was Bayou-Spiced Rockfish. It also listed the prep time, that it was gluten and nut free, the difficulty level, the ingredients I would be using, and a picture (this I really appreciated!) of the final product. When I flipped over the card, it listed the nutrition facts for the meal, what tools I would need to use, and detailed instructions with more photos! So far I was really enjoying my purchase!

I started to work on prepping the veggies and potatoes. What I really enjoyed was the fact that I had minimal dishes getting dirty in the kitchen. When I was finished, the only items I needed to clean were a knife, cutting board, and skillet. This was a plus for sure! After the veggies and potatoes were prepped and ready, I switched those out for the fish. The pan was hot so it didn’t take long at all for it to cook.

Hello Fresh Meal.jpgHello Fresh Veggies.jpgThe final thing to do was to put it all on the plate and taste it. I thought it was delicious! The portion size was ideal, the flavor was great, and the prep and cleanup were easy! From start to finish the time was around 30 minutes before eating.

The other two meals that I was shipped were also tasty. Each of those took around 35 minutes to prepare (due to a longer cooking time for the chicken and beef), and they both involved one extra piece of equipment to wash.

The Verdict: Thumbs Up!

Overall I was very happy with the service. What I really liked was the option to skip weeks easily when you don’t want a delivery. I was really delighted with the Hello Fresh process. If you have been wanting to cook balanced meals and do more healthy eating, this is the easiest way I know of to get started. Try one soon and let me know what you think!

Like what you've just read? Click here to subscribe to our blog!

This blog was written by Angie Mitchell, RD, Wellness Coordinator. To find out more about the NIFS bloggers, click here.

Topics: NIFS nutrition healthy eating wellness cooking dietitian

From Mini-Marathon Participant to Ironman: NIFS Leader Nick Iaria

Nick-Before.jpgnick-after.jpgLongtime NIFS Mini-Marathon Program leader Nick Iaria shares his personal story about the NIFS Mini-Marathon Training Program, his fitness changes, and his path to completing an Ironman triathlon.

How long have you been involved in the NIFS Mini-Marathon Program, and what made you decide to join?

I joined in 2009 as a participant, not a leader. I was a part of the run/walk group, and up to that point in my life had never completed a distance over 5 miles. Since 2010 I have been a group leader in the run/walk group and have transitioned to different time-specific groups over the years (11-minute, 10-minute, etc.).

I found out about the program from my then girlfriend, now wife, who was an intern at NIFS, and she was joining as a run/walk leader. I think I joined not just because of her, but because I was interested in finding out if I could do it. I don’t think I would have just gone out of my way to train for it on my own. I needed the knowledge and experience that NIFS gave in the training program format to get me started.

Since being a part of the program you have gone from the run/walk group to, in 2017, leading the 8:30 pace group. How did you manage to increase your speed?

I would like to say I did X and then Y and that led me to Z, but that isn’t how it worked. I am not sure what path got me here, but I think I just had a desire to improve and to continue just for the purpose of continuing. I do think that a large improvement came in the form of my mental training over the years that became a critical step in enhancing my physical development, which led to an increase in speed. It was never really my goal to get to a certain pace or speed; it just kind of happened.

Another key ingredient is core body strength. By improving the strength of my midsection and upper legs over the past two years, it has helped in pushing through the “I want to slow down” or “full-out quit” moments. The mental/physiological improvements I have made within myself—where I believe more in myself and I learn to listen to my body and learn from past mistakes during runs or events where I didn’t do the right things along the way—has been a key part of my success. I don’t take anything as a failure, just a learning opportunity for the next time.

 Mini_logo_2019_small

FIND OUT MORE ABOUT THE PROGRAM AND GET REGISTERED TODAY! EARLY BIRD PRICING THROUGH NOVEMBER 30, 2018!


Why do you enjoy running?

Until recently I have never considered myself a runner; I always considered myself a jogger. However, the stronger and longer I go, the more I feel like a runner. I enjoy it because I can do it whenever (early morning, evening, etc.) and wherever (outside in the elements or inside on a treadmill, etc.). I don’t need anything besides a good pair of shoes and sometimes some good music to get me started or keep me going. It is something I can do alone or with other people. It is versatile as I can go different speeds or distances, and it is easy to track both with different forms of technology so I can track my results as I go.

Last year you were a Mini-Marathon Ambassador. What did that mean, and why do you love the Mini-Marathon so much?

I felt really honored to be a part of the program’s first year. There was an amazing group of 32 other people from all walks of life with different Mini experiences. Getting to interact with them and being able to help others who had questions or needed advice on the Mini made this year’s race that much better when I rang the PR bell at the finish.

My love for it came with my first time back in 2009. I was in a car accident (not my fault) 2.5 weeks before the race and had 5 stitches put in my knee. They were taken out the Monday of race week. I went back and forth all week about whether I should even do it, and that went all the way up to the morning of the race. For some reason I thought I could deal with the pain and still go out and run/walk the full 13.1 miles, but only made it through 4 miles. I knew I had to walk in order to finish and I WAS GOING TO FINISH. Walking the next 9 miles was really fun (and a bit painful) to be walking and interacting with all the different walkers and groups on the side of the road/track cheering us all on. My experience would have been different if I wasn’t walking and taking it all in. Plus, I ended up posing for one of the photographers on the track and ended up on one of the 2010 Mini advertisement posters, so that was an unintended perk, too.

What advice do you have for individuals just starting out or thinking about training for a half marathon?

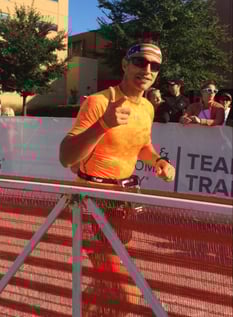
If it is something that interests you or if you are looking to see how far you can push yourself, I know that feeling. I went way outside my comfort zone recently when I signed up for a full Ironman triathlon (that’s 2.4 miles of swimming, 112 miles of biking, and 26.2 miles of running). It was way outside my comfort zone since I had never swum that far, never biked that far, and had only completed 26.2 miles twice previously at an average completion time of around 6 hours, and it was a struggle just completing the 26.2 miles, so combining all those into one day seemed unattainable. But I told myself there is only one way to find out, and with the support of my friends and family, I signed up, got a triathlon training program, and on October 9 I reached my goal and crossed the finish line.

So, that is my advice: If you are thinking about it, then you probably already want to do it, but just need that confidence or something that helps you to convince yourself that you can reach that goal. I know that you can do it, no matter your level of experience or age. I would say join a program like I did when I joined the NIFS program back in 2009. It will help in learning what to do and when to do it, plus it will help provide that accountability from start to finish for you. The finish line doesn’t care if you run, jog, walk, or roll across it; it only cares that you cross it.

***

Congratulations, Nick, on a wonderful accomplishment! And thank you for your continued dedication to the NIFS Mini-Marathon and 5K Training Program. If you have been thinking about competing in the Mini-Marathon or any other spring half-marathon, or training for a 5K, registration is now open for these NIFS programs. Sign up here!

 Like what you've just read? Click here to subscribe to our blog!

This blog was written by Amanda Bireline. To find out more about the NIFS bloggers, click here.

Topics: NIFS exercise motivation running weight loss group training triathlon mini marathon accountability NIFS programs core strength goals 5k strength training weight training Mini-Marathon Training Program Ironman

Nutrition and Fitness Accountability to Get You Through the Holiday Season

ThinkstockPhotos-524163310.jpgIt’s the time of year that no one wants to talk about. But let’s face it: Christmas decorations have been out in stores for over a month, and the holidays are just around the corner. And for many across the nation, the holidays are one of the most dreaded times for unhealthy eating and putting on unwanted excess weight. But it doesn’t have to be like that. Don’t let this time of year scare you. Instead, view it as an opportunity to meet the weight management challenge for a better you!
Tips for Finding Balance at Thanksgiving, Christmas, and Beyond

The holidays are hard, and I would never deny that. Travel bogs you down with fast food on the road and in the airport; visitors come to the house to stay for a week at a time and you have to do all the cooking of holiday meals; and those delicious goodies that seem to appear only once a year are ever-present on the counter yelling, “EAT ME!” So with all this, how do you stay on track? Allow me to share a few ideas that come to mind for having a successful holiday season with your eating and exercise.

  • Find a nutrition balance. While I am not encouraging you to go out and have five of your favorite cookies every day, I am going to say it’s okay to have one. The key to being successful and not overdoing it with what you put into your mouth is balance. There are times through the holidays that the red velvet cake is staring you in the face, and if you do decide you are going to eat it, then create a balance. What are you going to say no to instead? A few tips: don’t eat the entire piece; leave some on the plate. Eat slowly and allow yourself to feel full rather than killing it in two bites. Drink water with it or milk that has some nutritional value. The more water you drink, the more you will feel full, allowing you to scale back on the cake intake.
  • Find a workout balance. You also need to find balance in the gym. You know those people who head to the gym for a three-hour workout on Thanksgiving morning? You don’t have to be that person. If you have a good balance of both exercising on a regular basis through the holidays and eating appropriately, you won’t need that 3,000-calorie burn before the big feast.
  • Have a plan. Making sure that you have a plan is essential to your holiday success. I have found when there is no plan in place ahead of time, it becomes a free-for-all, which leads to overeating. Make a plan before the holidays start and create goals that are both realistic and attainable for yourself. If you know you have travel coming up or you know that you are hosting for a week, come up with a plan that makes sense for how often and how long you will be able to work out each day, as well as what you will be eating and potentially cooking for guests.
  • Stick to the plan. Having a plan can be the easy part, but sticking to that plan is the challenge. Make sure that you commit to your goal: if you said you were going to work out three to four times a week, do it! If something comes up and you can’t get to the gym, do something at home. The biggest thing is to not allow yourself to make an excuse. You may have to get up a little bit early before the guests arise for your homemade waffles, or make sure the hotel that you are staying at has a gym. Whatever you need to do to stay on track, make it happen.
  • Have some accountability. Figure out what type of accountability works for you. Maybe it’s coming up with that plan with a friend or family member. Or maybe it’s tracking it through a fitness tracker, signing up for a personal trainer, or joining a program the gym is putting on. Whatever it may be, find what works for you and commit to doing it.

Like what you've just read? Click here to subscribe to our blog!

Questions? Please contact Ashley Duncan (aduncan@nifs.org or 317.274.3432, ext. 226).

This blog was written by Amanda Bireline, Fitness Center Manager. To find out more about the NIFS bloggers, click here.

Topics: NIFS fitness nutrition fitness center holidays accountability NIFS programs challenge focus weight management workout goals Thanksgiving muscle building christmas fit3d

Group Fitness Class of the Month: BODYATTACK

BODYATTACK.jpgGroup fitness classes can be a great combination of both cardio and strength exercises jam-packed into a session that ranges anywhere from 30 to 60 minutes. Whether you are a rookie or veteran to the gym, a group exercise class can be a great place to look to when thinking about what to do for your workout. And with the huge variety of classes that most fitness facilities offer daily, you can get just about anything you are looking for in a workout.

Over the next several months, we are going to highlight a group fitness class of the month. We will be taking a closer look at what each class is composed of and the benefits of it. I understand that sometimes pulling up a facility’s group fitness schedule can be overwhelming, with all the options and names of things you’ve never heard of, but hopefully this will help you to understand that these classes are something doable and well worth your time at the gym.

Often, along with the overwhelming amount of classes offered each week, the intimidation factor can play a large role. Let me help soothe those uneasy feelings by telling you it’s okay: just jump into the class and you will quickly blend right in! Now I know that not all group exercise classes are for everyone, and not everyone is going to agree that all classes offered are the best option, but with a well-rounded selection of classes, strength training, and cardiovascular exercise, you will be well on your way to fit!

LM ATTACK CMYK BUTTON�.jpgWhat Is BODYATTACK?

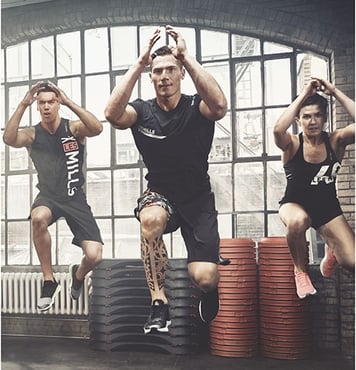
This month we are going to take a look at the NIFS Class of the Month, BODYATTACK! BODYATTACK is the sports-inspired cardio workout for building strength and stamina. This high-energy interval training class combines athletic aerobic movements with strength and stabilization exercises. Dynamic instructors and powerful music motivate everyone toward their fitness goals—from the weekend athlete to the hardcore competitor. This class can be catered to anyone, from the first-timer to the frequent attender. You will see a combination of athletic components like running and jumping intertwined with strength exercises like squats and pushups. You will also experience a variety of fitness styles including aerobics, plyometrics, agility exercises, upper- and lower-body conditioning, power movements, and core strengthening exercises[watch video].

BODYATTACK is a full-body workout lasting 60 minutes. And though the class may look intense from a distance, any group class like BODYATTACK can be tailored to each and every individual fitness level. No matter what level you are at and choose to do in the class, BODYATTACK is designed to burn calories, help you tone up, and get into better overall shape through the various movements.

Tips for Your First Class

With all this, I know it can still be scary stepping up to your first class at the facility. If it is your first time, allow me to give you a few pointers:

  • Get to class a few minutes early and introduce yourself to the instructor. This way you will feel more comfortable and the instructor can help you get set up if necessary.
  • Set up your stuff close to the front, or at least in good view of the class instructor so that you can watch what he or she is doing closely.
  • When the level options are given, take the lowest one first. Even if you consider yourself an elite athlete, sometimes classes may take you by surprise. Take the easiest level first and then ramp it up when you begin to feel more comfortable and confident.
  • Keep moving! You won’t master every single exercise or move during the class, and that is okay. If you mess up, just keep moving to the beat of the music and pick back up on the next move.
  • Don’t be intimidated! Contrary to popular belief, no one is watching you.
  • Be okay with giving it a second try—we all know how intimidating it can be when you walk up and you have all those “group ex-ers” who know the next move before it even begins. Be patient and try the class a second time. That will be you in no time!
  • Have fun! Laugh, make connections with others, and enjoy the next hour of time you have celebrating yourself and the journey to a healthier lifestyle.

Now that you are ready, give BODYATTACK a try! NIFS offers BODYATTACK two different times a week. Keep in mind all the great things that group exercise has to offer.

Not a member? Try a class for free!

Try a group fitness class for free

This blog was written by Amanda Bireline, Fitness Center Manager. To find out more about the NIFS bloggers, click here.

Topics: NIFS cardio fitness center group fitness strength Les Mills plyometric core strength strength training aerobic BODYATTACK Group Fitness Class of the Month

Periodization of Your Workouts for Maximal Strength Gains

deadlift-3.jpgPeriodization is a fancy word for timing out your strength training to avoid mishaps such as overtraining, undertraining, or psychological “burnout.” A correctly periodized training program allows for maximal strength gains within the time frame of the program.

There are several different subcategories within the realm of periodization. The two most popular forms are linear and undulating periodization, and they can be similar in effect, yet they are quite different in execution.

Linear Periodization

This is a great example of the KISS (Keep It Super Simple) method. This type of programming calls for simply adding weight to your lifts, week after week, and trying your very hardest to outwork your previous workout. This tried-and-true method has shown results in all levels of lifters and athletes, from novice to advanced competitors.

“Linear” refers to the line of progression when you look at the weights used from each workout to the next. This line will slowly and steadily increase until the end of your program, when it is time to show off how strong you have gotten. A typical linear periodization program will last anywhere from 8 to 16 weeks.

Undulating Periodization

Now that you are familiar with linear periodization, take that nice straight line and make it a chaotic zig-zag from the first week of the program to the last, and now you have undulating periodization. Basically, instead of increasing weight or reps linearly throughout your program, you will consistently be adding or dropping weight and/or reps from each workout to the next.

The idea behind undulating periodization is to allow optimal recovery time between ultra-intense workouts, eliminating physical or mental overtraining. This is a method often used by more advanced lifters and athletes because of the commonly intense nature of the training sessions. For example, if a competitive powerlifter trained three days a week, a sample week of their program might look something like this (percentages shown are those of the respective one-rep max for each individual lift):

  • Day 1: Squat—80% 5 sets/3 reps
  • Day 2: Bench Press—70% 6 sets/3 reps
  • Day 3: Deadlift—75% 3 sets/8 reps
Which Method Should You Choose?

Neither of these methods has been proven to be better than the other. Each person will have their own opinions on which is better and why. I would suggest starting with linear periodization for two reasons:

  1. It is a very easy method to follow. There is no reason why anybody should start a linear program and not be able to finish it.
  2. It is a very accommodating method for beginner lifters. It is effort based, and what you give is what you get.

Like I said previously, these methods might not be ideal for everyone. They are great templates for individuals who want to get stronger, but they must be tailored to best fit you and your goals. For more information regarding training programs, ask of the NIFS Health Fitness Specialists to create one for you. If this methodology intrigues you and you would like to try it out, specifically mention this blog and they will create a program based on one of these training strategies.

This blog was written by Aaron Combs, NSCA CSCS. To find out more about the NIFS bloggers, click here.

Topics: NIFS workouts NIFS programs weight lifting strength powerlifting strength training programs periodization

How to Get the Most Out of Indoor Cycling (Spin)

cycling.jpgAre you one of those who either hate to run or find it is too hard on your body? You like to bike but right now it is way too cold to ride outside. Well, one of the greatest indoor group training classes that is offered is indoor cycling, or spin! While the benefits of spinning can be a whole additional blog, I’ll just say that it’s a great cardiovascular exercise as well as a tool to build strength in the legs and butt.

Adjusting the Bike

We’ve all been there one time or another: your toes go numb, your neck or lower back starts to hurt, or you begin to feel tingling in your fingertips. All these can be a result of not having the bike adjusted properly for your body. Don’t make the mistake of jumping onto a bike that someone else has just been riding on and think it’s the right fit.

Whether it’s a spin class, RPM, or another type of cycle class, making sure that you are set up on the bike properly is of utmost importance. Let’s take a closer, step-by-step look at how to get set up:

  1. Set the saddle (seat). Begin by standing next to the bike. Raise one of your knees to a 90-degree angle and locate where your hip bone is on that same leg. Once you have done so, you can put both feet back on the ground and raise or lower the seat to the spot on your hip that you have indicated. You can get onto the bike to feel for comfort. Another good indicator is that when your leg is fully extended on the pedal, there should be a 5- to 10-degree bend.
  2. Position your feet on the pedals. Get on the bike and place your feet so that the ball of your foot is on the axle or back part of the pedal. While pedaling, the pressure should go through the ball of your foot and not the arch. If you are wearing tennis shoes and have a cage, you will want to tighten the straps to help secure your foot.
  3. Position your knee. You need to be sure that your knee does not overshoot your toes. If you were to draw a straight line from the front of your kneecap down toward your foot, it should line up behind your toes. Do a few revolutions and make sure that you feel comfortable. If you are still not sure about your positioning, this is a good time for someone to easily help you. Have someone stand behind you while you are pedaling and watch your hips. There should be no movement or dropping of the hips as you extend through the pedal.
  4. Adjust the handlebar height. Much of this is personal preference, but there are a few tips for people who don’t bike all the time to get adjusted correctly: comfort, comfort, comfort! Start with the handlebars at the same height as the seat (look at the seat and see what your adjustment is; it may be indicated by a number or letter). As you begin to ride, you will want to be sure that you feel comfortable. Watch for neck or lower-back pain and shortness in the hamstrings. If you often ride a road bike, lower handlebars may be more comfortable. This is okay as long as you don’t begin to pull on the hamstrings.
  5. Adjust the distance of the handlebars. This is also heavily weighted on personal preference and comfort. You want your shoulders to be as much over your hands as possible and have a slight bend in the elbows. Remember, be comfortable! If you begin to feel tingly hands or numbness in the arms or neck, you need to adjust your handlebars.


Don’t Be Afraid to Ask for Help

If you are ever uncertain, you can always ask the class instructor to assist you. I would always advise you to get to class a few minutes early to get adjusted and ready. Enjoy, and cycle on!

This blog was written by Amanda Bireline, Fitness Center Manager. To find out more about the NIFS bloggers, click here.

Topics: NIFS exercise fitness cardio fitness center group fitness group training cycling biking spin indoor cycling RPM